Difficulty Level : Intermediate
License Requirement : Community Plan or Power Apps / Power Automate per app or per user plan
If you are not interested in the inception of this, skip the very interesting story and just jump to Let’s Create.
This whole idea started when I was on a road-trip from Cincinnati to Orlando with my #FlowFam ( Jon Levesque, Anton Robbins and Ed Gonzalez). We had more than 12 hours to spend and to make the most out of it we could only do one thing - Make a flow!
The flow had to be something around the road trip and we wanted to involve the community so that they felt like they were a part of it. So, we thought what if we could create a flow which when triggered manually, takes the geo location and the song that we are currently playing on Spotify and posts it on Twitter. And 1 hour later -
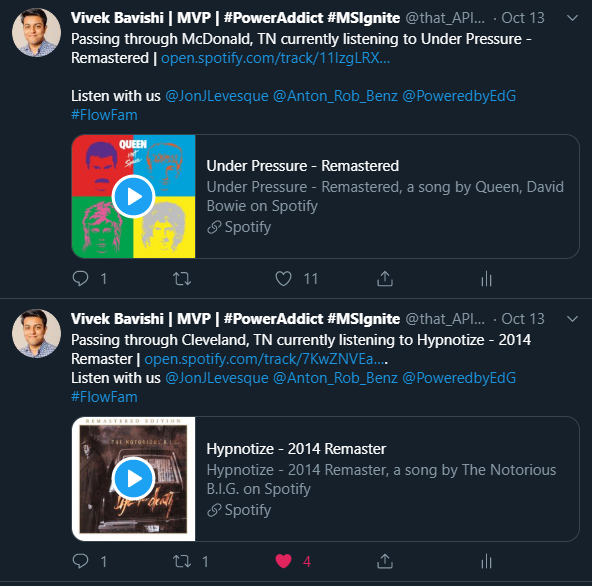
To take it to the next level, we created a flow to accept song requests from twitter , which we received as approvals (as some people were rick rolling us) and then as we hit on approve, it played the song right then. To see all this in action, watch this video from Jon who vlogged the whole story -
Adventures in Community 29 – SPS Cinci and the #FlowFam Road Trip to Summit
When I built the flow (in the backseat of the pickup) I couldn’t make the best optimized version of it. I actually wanted to use a custom connector, however, for some reason that wasn’t working correctly and that’s why we had to use HTTP actions in flow and I had to generate a refresh token every hour and change it in the flow.
Let’s create
In this blog post, we will create a custom connector to connect to the Spotify API and use it to search for tracks, play a sound track and get the current playing track.
- Step 1 - Register an app on Spotify
- Step 2 - Create a custom connector
- Step 3 - Use in Power Automate and Power App
If you are thinking about not doing this because custom connectors are premium, WAIT! You can create a community plan for your personal use for free!
Step 1 - Register an app on Spotify
If you don’t have Spotify premium, you can still use the custom connector , however, you won’t be able to play specific tracks. So, I would highly recommend getting the free trial.
Follow the steps below to create an app on the Spotify developer portal -
https://videopress.com/v/wF6XHKsc?preloadContent=metadata
Once you have created the app, you can copy the client id and client secret and paste it in notepad or whatever you think is a secure place (probably a sticky note pasted on your monitor)
Step 2 - Create a custom connector
If you don’t know anything about custom connectors or APIs , don’t worry! I didn’t know anything about it a year ago (and yes I still call myself That API Guy)
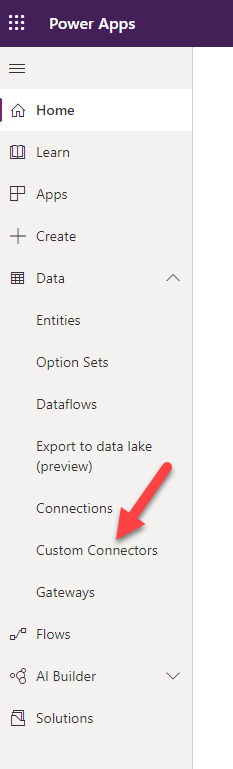
First, go to either make.powerapps.com or flow.microsoft.com and log in with your credentials. Click on custom connectors in the left navigation menu.
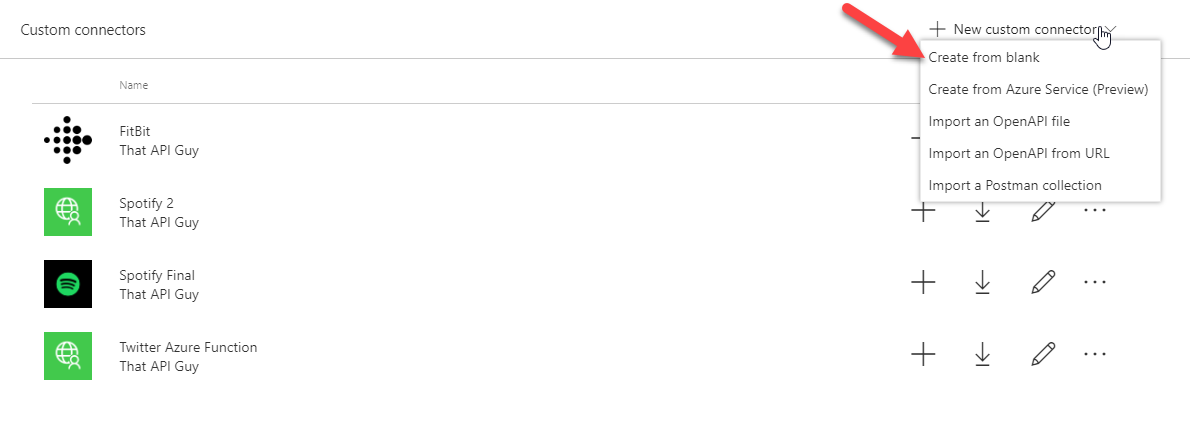
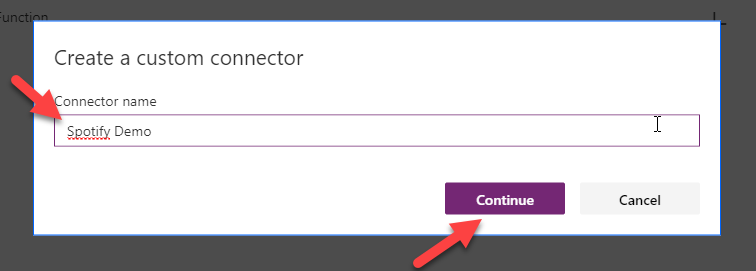
Next, click on New custom connector -> Create from blank. Then enter a name for the connector and click on continue.
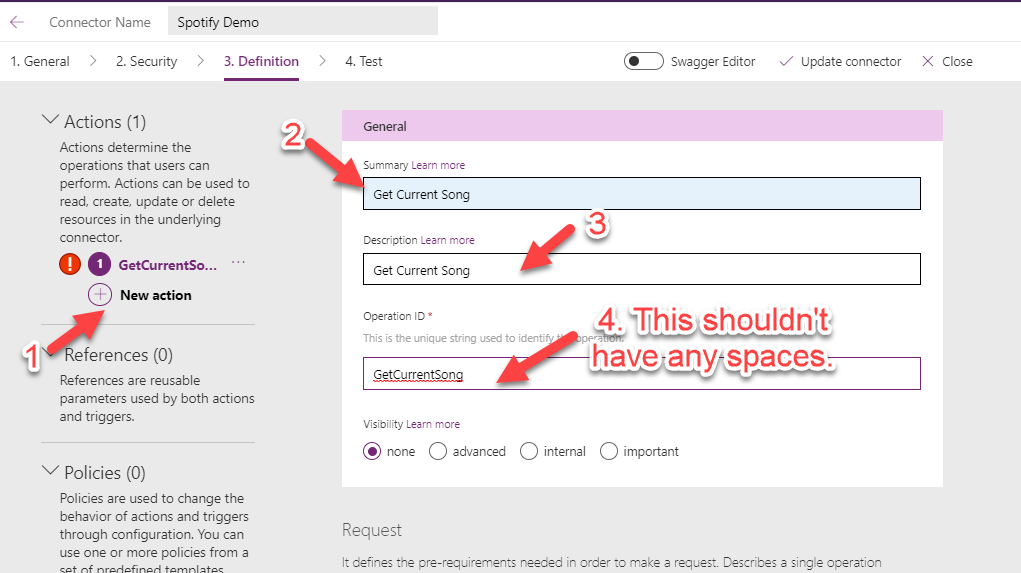
Now, you will see a wizard kind of experience with 4 steps, each of which I have described below with the screenshots.
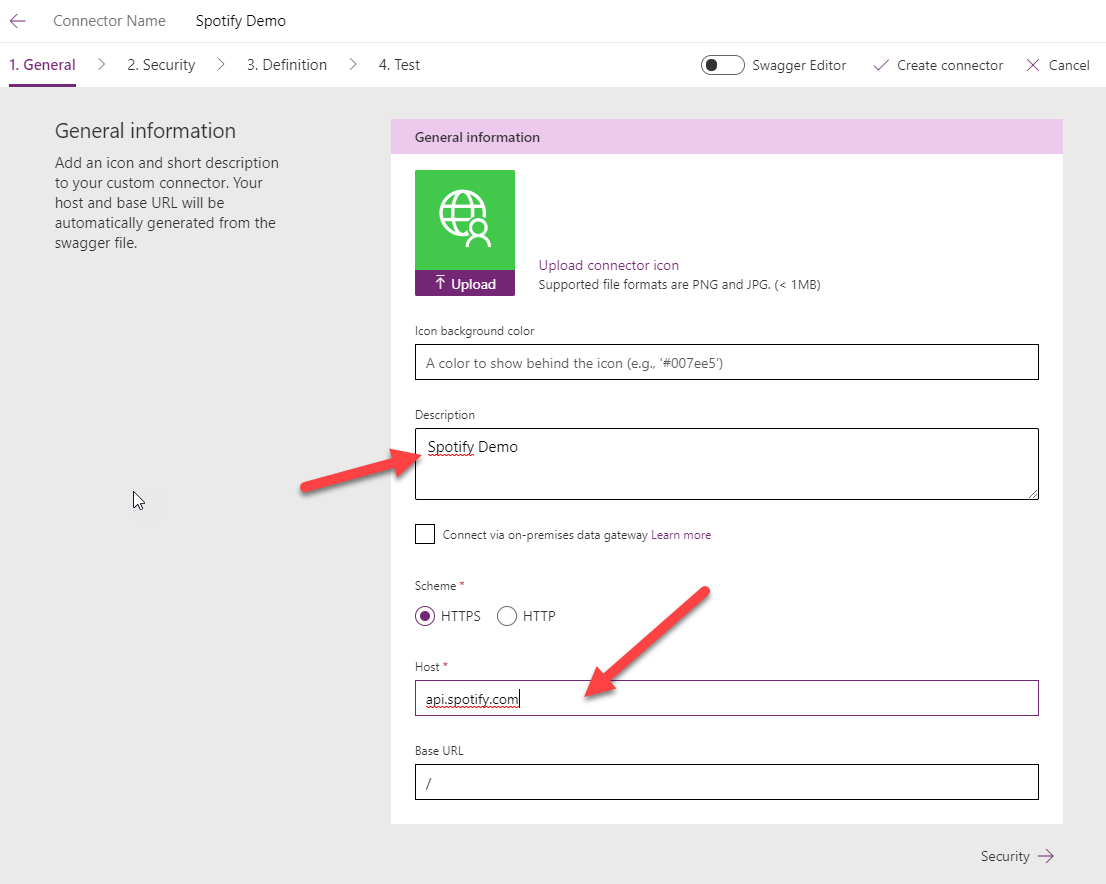
General screenshot
In the security tab, use these values-
- For Authorization URL : https://accounts.spotify.com/authorize
- For Token and Refresh URL : https://accounts.spotify.com/api/token
- Redirect URL - This will be generated after you click on create connector.
- For Scope : user-read-currently-playing user-modify-playback-state playlist-modify-private playlist-read-collaborative playlist-read-private user-read-playback-state
Scope defines what permissions you want to give to you to your Spotify app. For this blog post, the scope above will be sufficient for all the actions that we want to perform. You can add / modify this later based on your requirement.
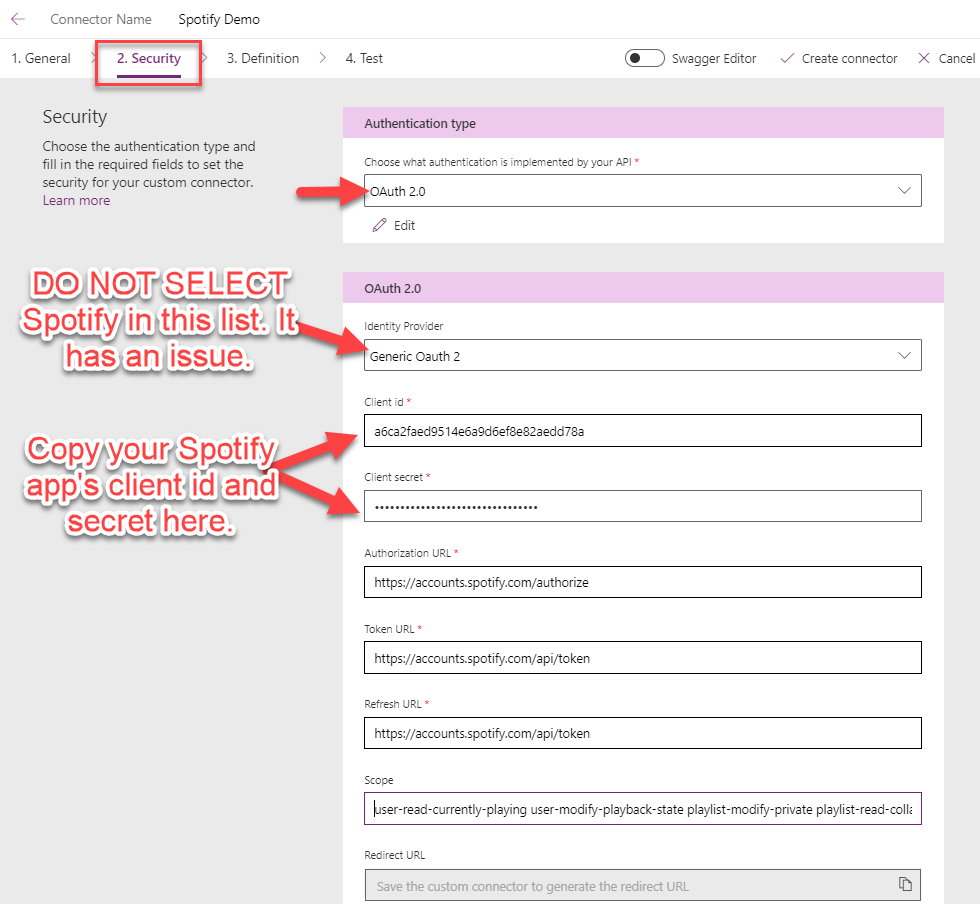
Security screenshot
If you select Spotify under the identity provider, it messes up the scope and doesn’t prompt you to allow for all permissions that you entered in the scope. So, don’t select it please.
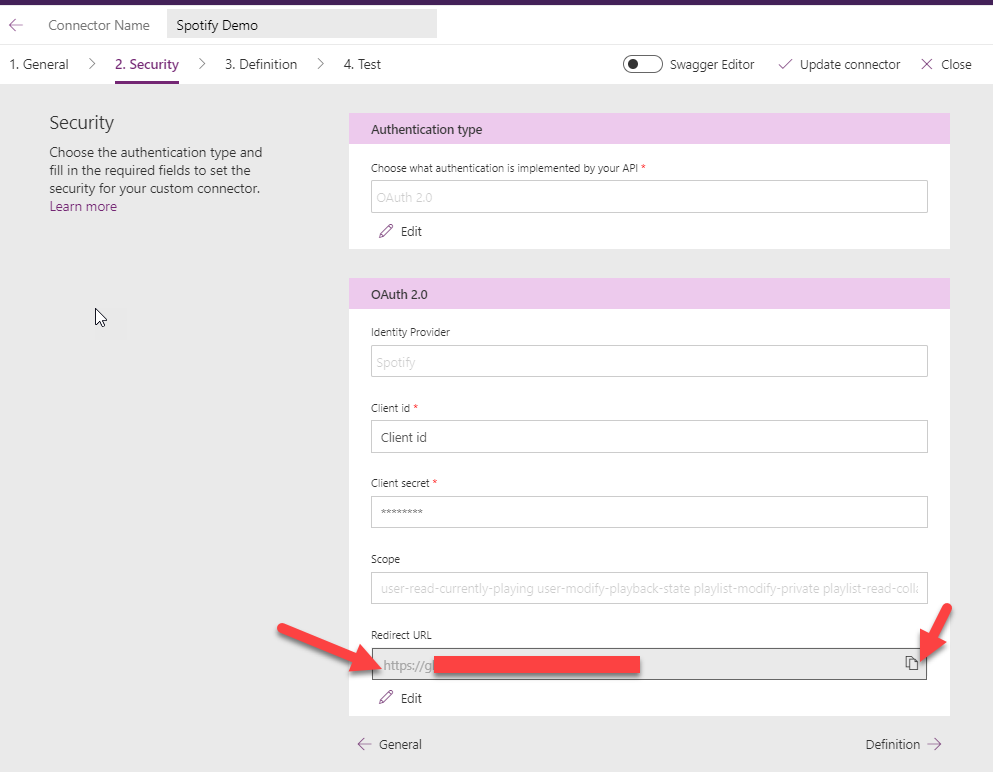
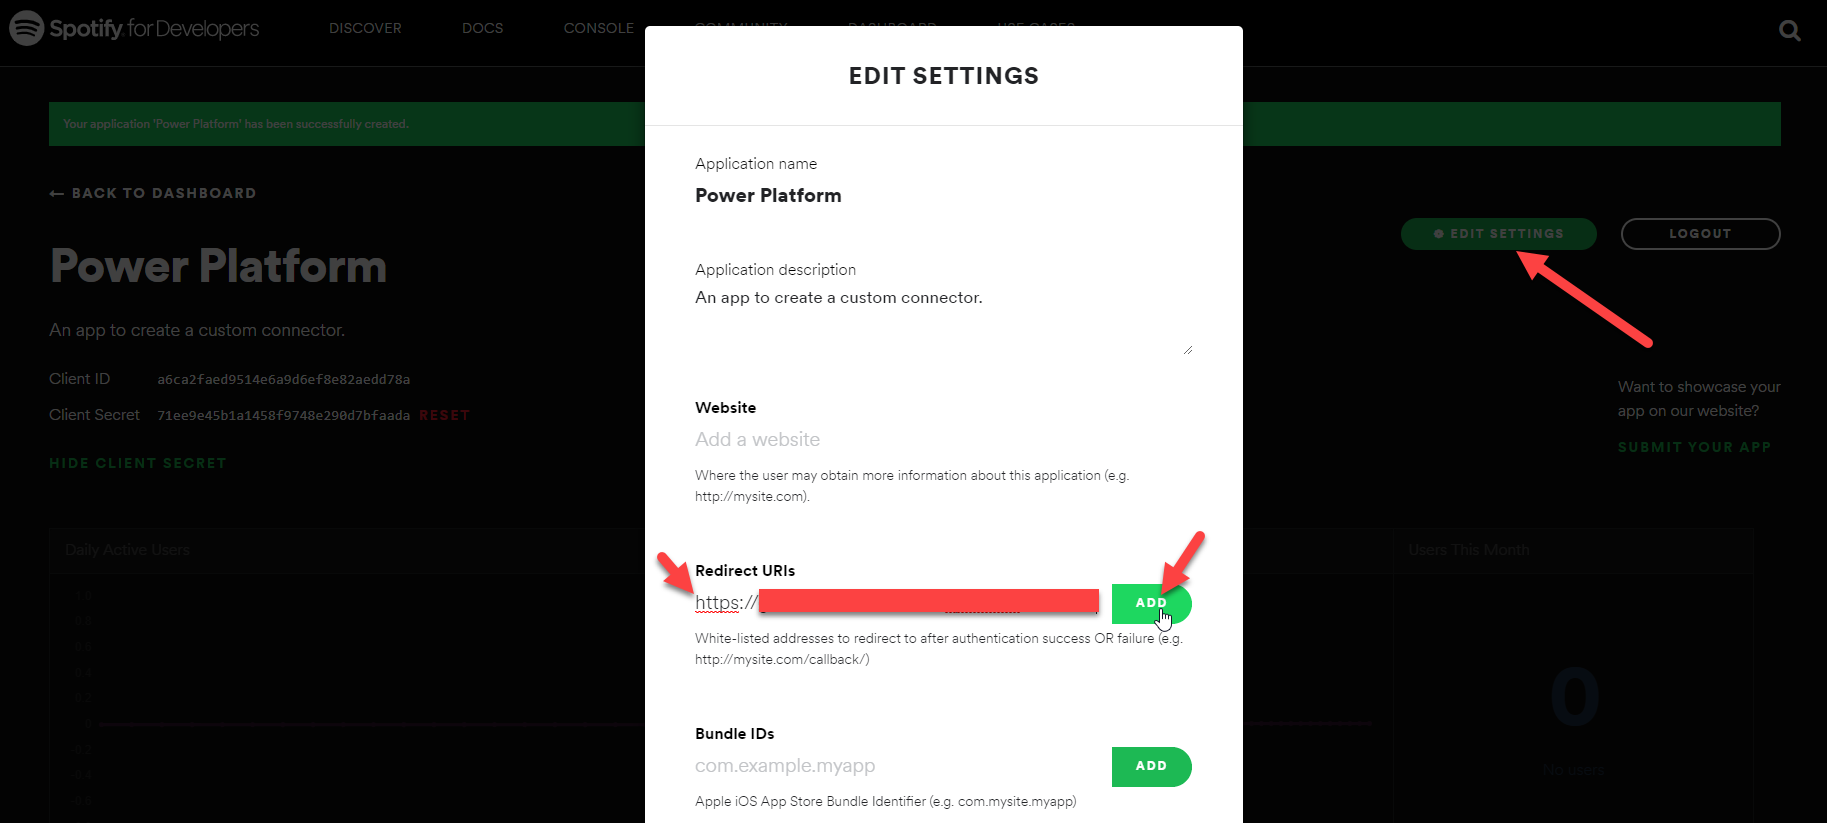
Click on create connector. You will now see that the redirect URL has been created. Copy it and paste it on your Spotify app’s settings and save it.

For the Definition step, let’s create an action to get the current song playing on Spotify. We will try some other API endpoints at a later stage.
Next, click on “Import from Sample” under the Request section to define the endpoint we
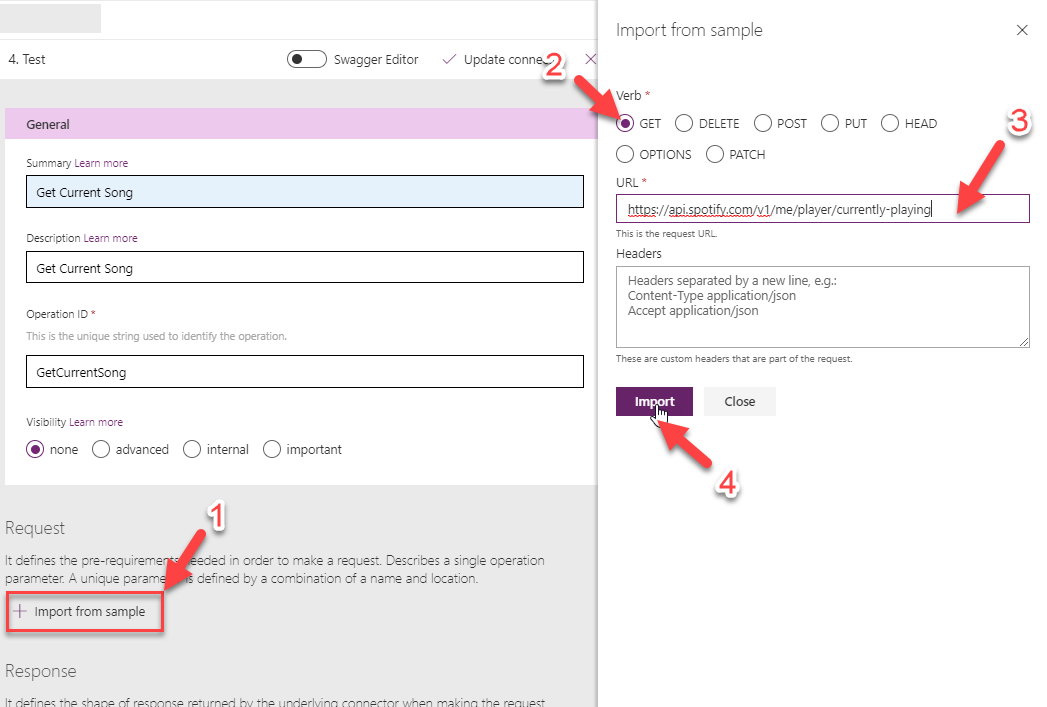
Click on “Update Connector” and then go to the last tab ‘Test".

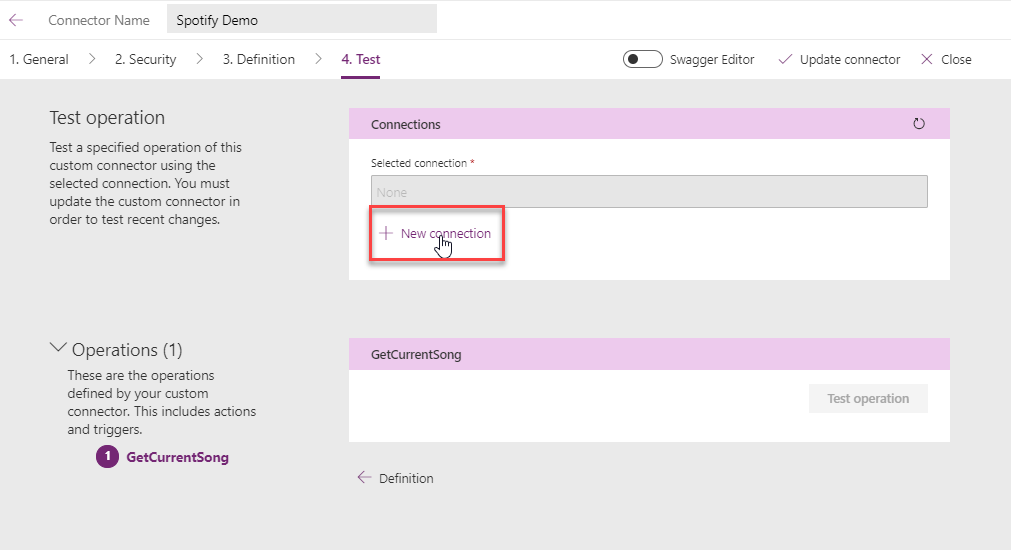
You will have to create a new connection to test your custom connector.
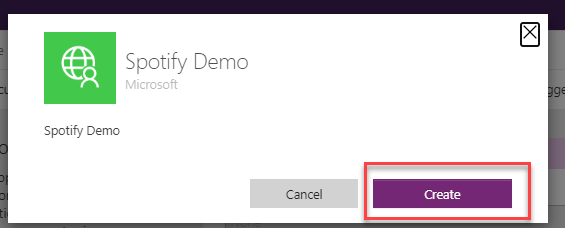
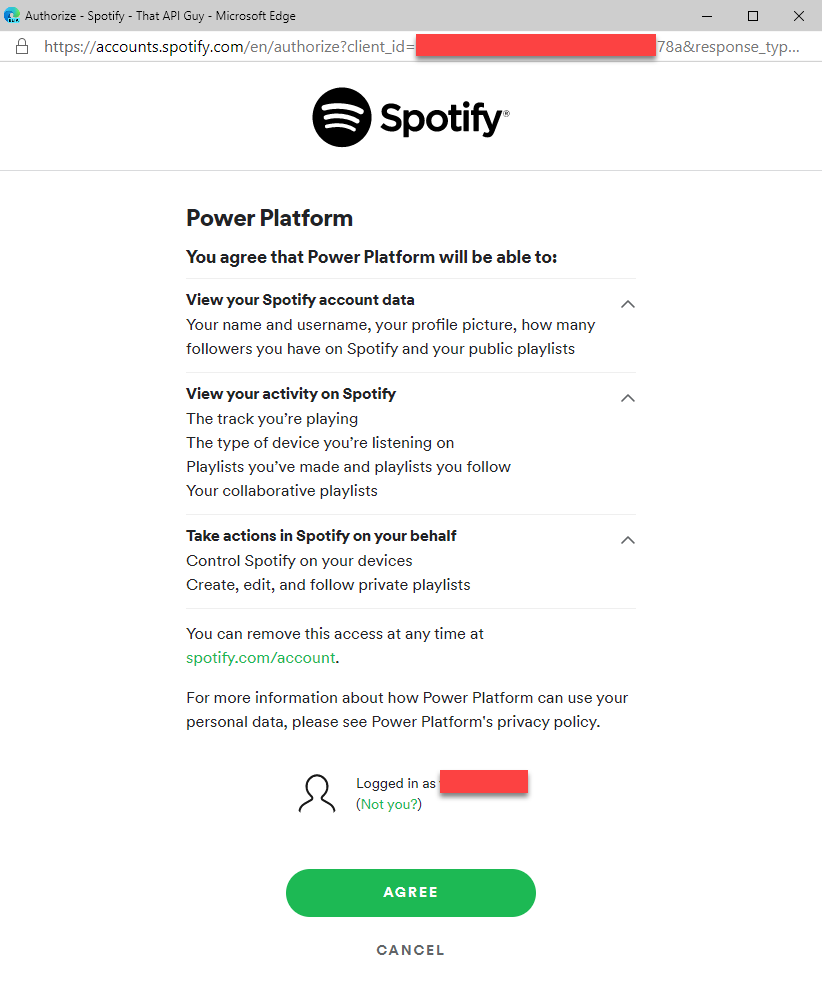
A window will pop-up asking you to log in to Spotify (if you aren’t already logged in to it in that same browser window). Once you log in, you will be asked to allow the Spotify app all the permissions that we entered in the scope. Click on agree the same way you would do for all the random apps in the world, at-least this an app that you created. You can TRUST this one! :)
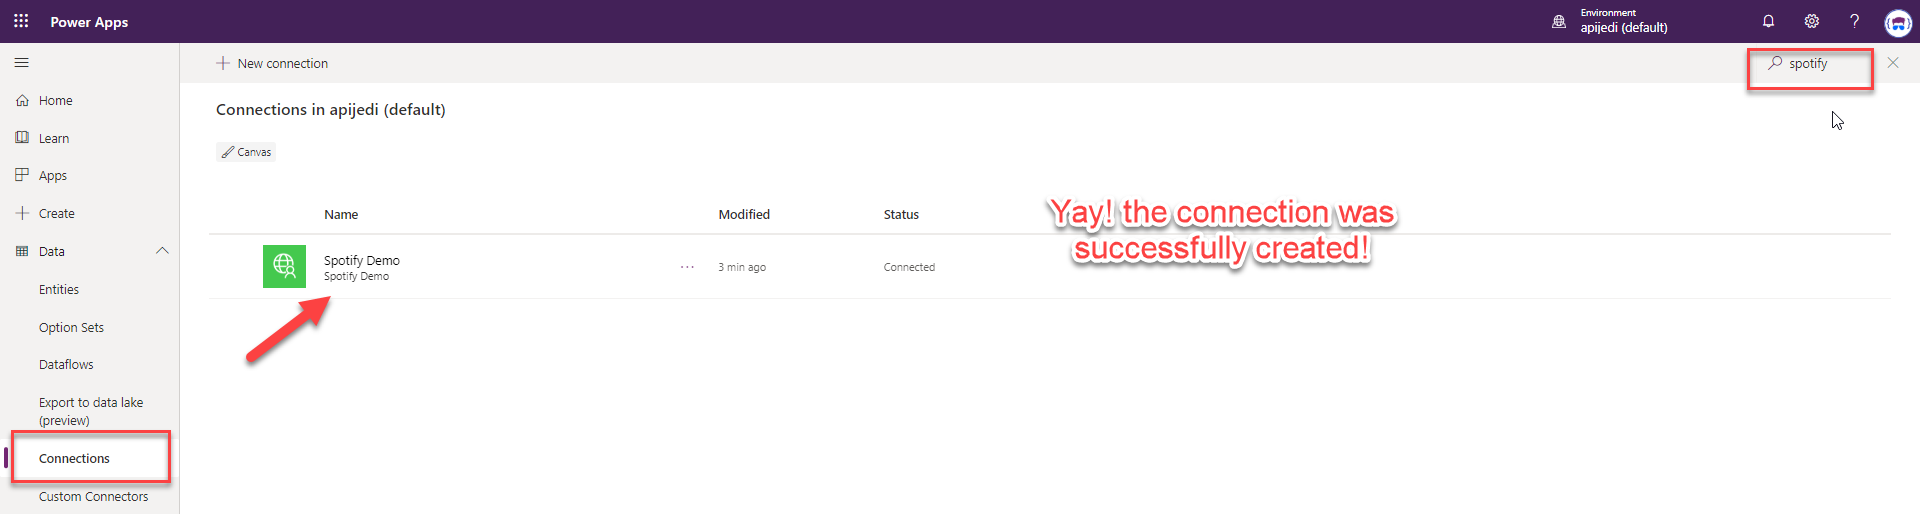
Once you click agree, the connection will be created and weirdly you will be redirected to the Connections page. You would think that it would stay on the same page and allow you to test, however, not everything comes that easy I guess. Anyways, now that you are on the connections page, just search for Spotify and check if connection was created.
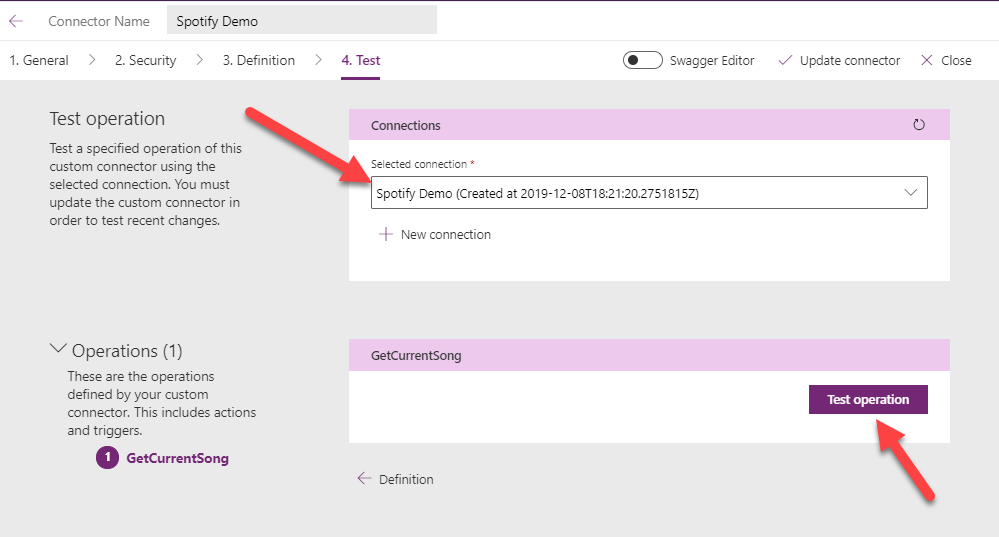
Now, go back to Custom connectors page and click on edit, and go to the ‘Test’ section. You will now see the connection that you just created in the Connections drop-down list. All that is left to do is to click on ‘Test Operation"! Before you do that, play a song on your Spotify.
Here’s a demo -
https://videopress.com/v/Eu41PUHc?preloadContent=metadata
👍 Wow! that must feel good to get that working. That’s just the start though.
Here are some more actions (API endpoints) to have fun with this connector. You can create a lot more from using this API reference doc.
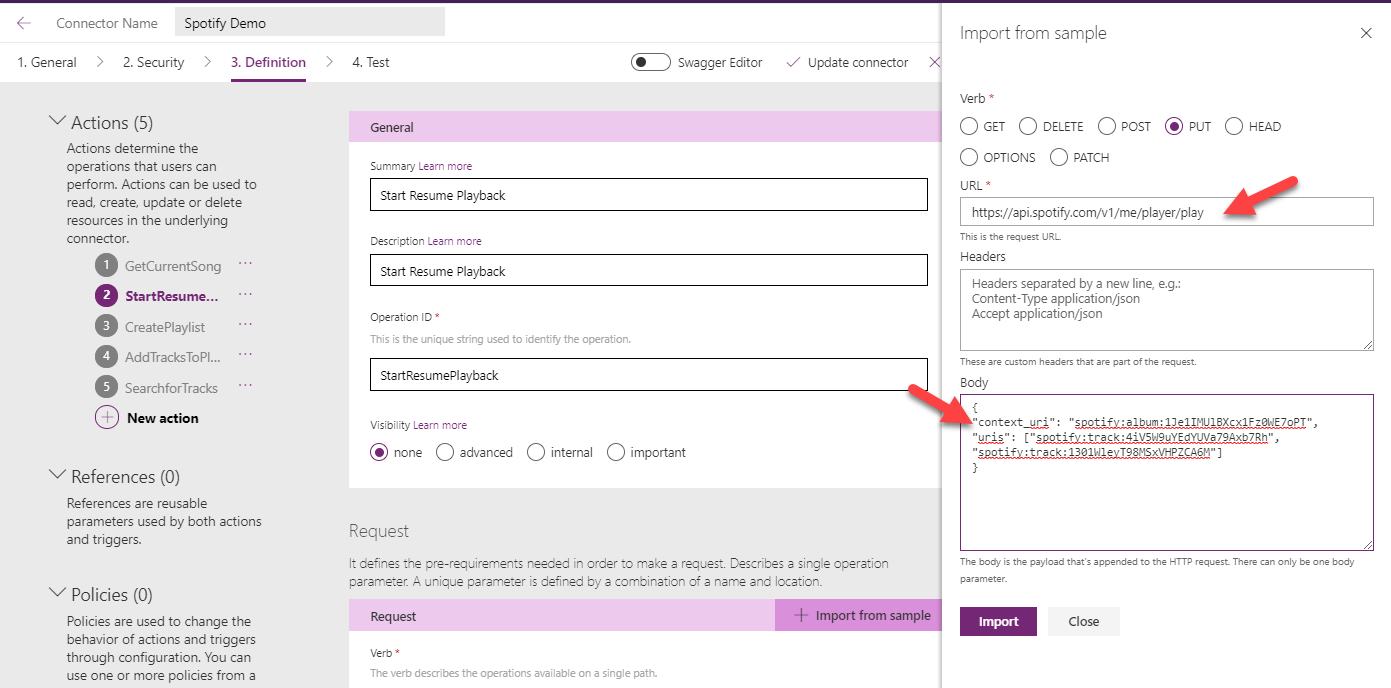
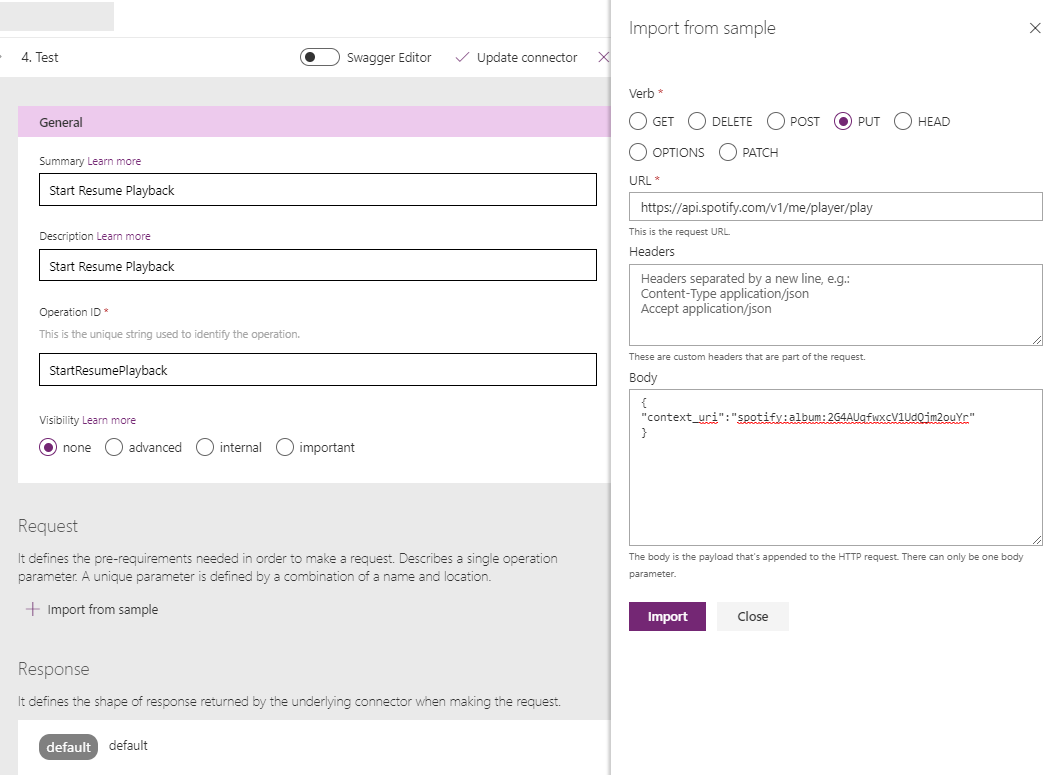
S_tart or Resume playback -_ https://developer.spotify.com/documentation/web-api/reference/player/start-a-users-playback/
 Sample data for body -
{
 "context_uri": "spotify:album:1Je1IMUlBXcx1Fz0WE7oPT",
 "uris": ["spotify:track:4iV5W9uYEdYUVa79Axb7Rh", "spotify:track:1301WleyT98MSxVHPZCA6M"]
 }
Start or Resume playback - https://developer.spotify.com/documentation/web-api/reference/player/start-a-users-playback/
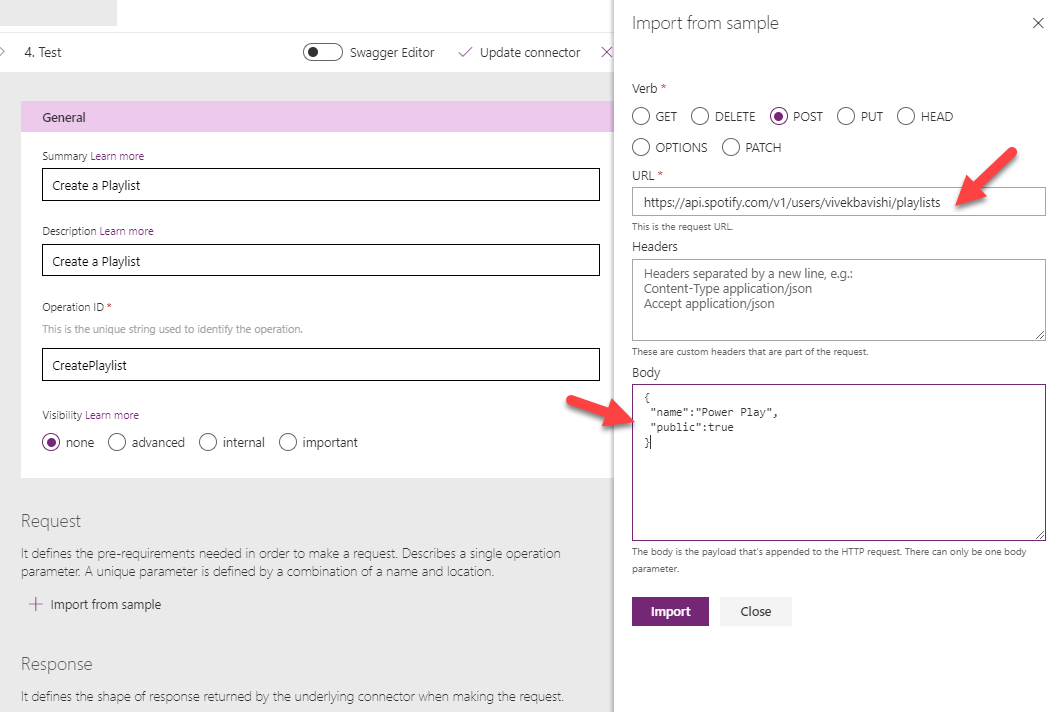
Create a Playlist - https://developer.spotify.com/documentation/web-api/reference/playlists/create-playlist/
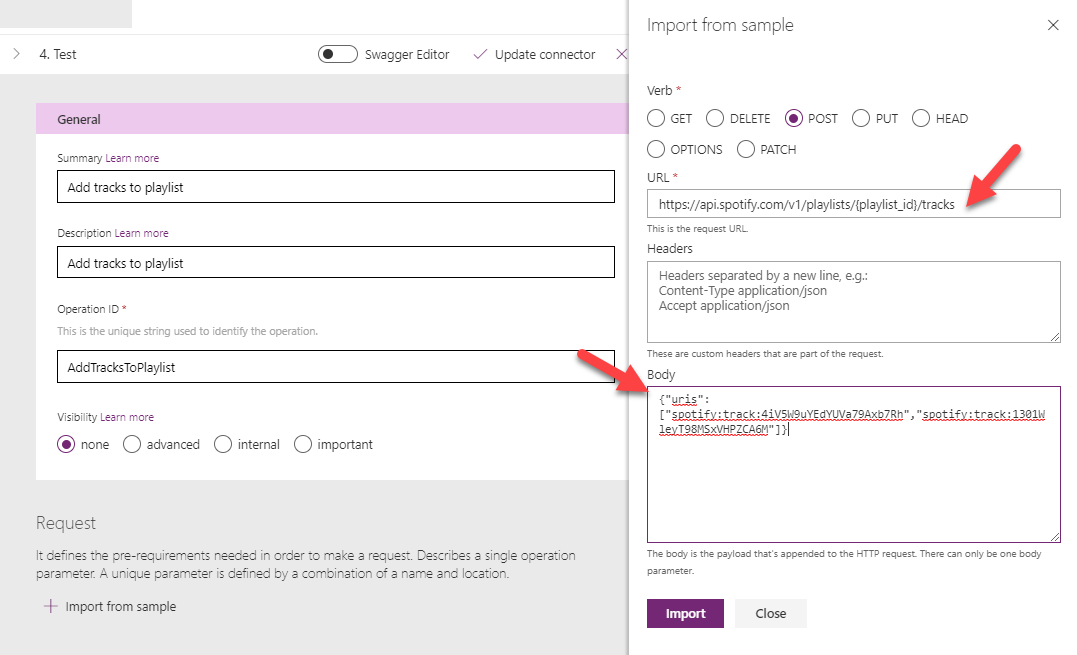
Add tracks to playlist - https://developer.spotify.com/documentation/web-api/reference/playlists/add-tracks-to-playlist/
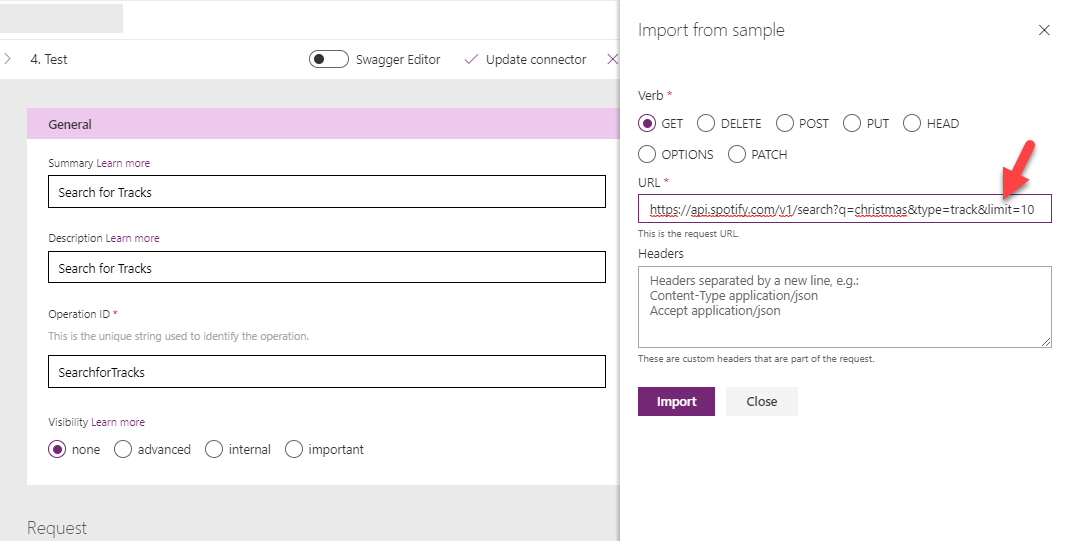
Search for tracks - https://developer.spotify.com/documentation/web-api/reference/search/search/
Step 3 - Use in Power Automate and Power App
Now that you have the custom connector created, let’s use it in a flow and app.
- In a flow - We will create a flow to search for a christmas song and play the first one from the list of results.
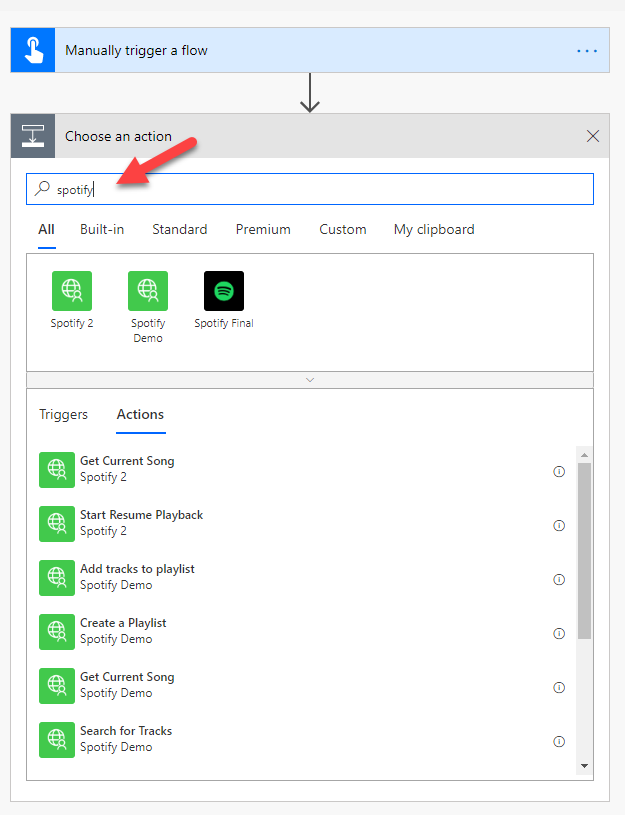
Search for the custom connector to find the actions
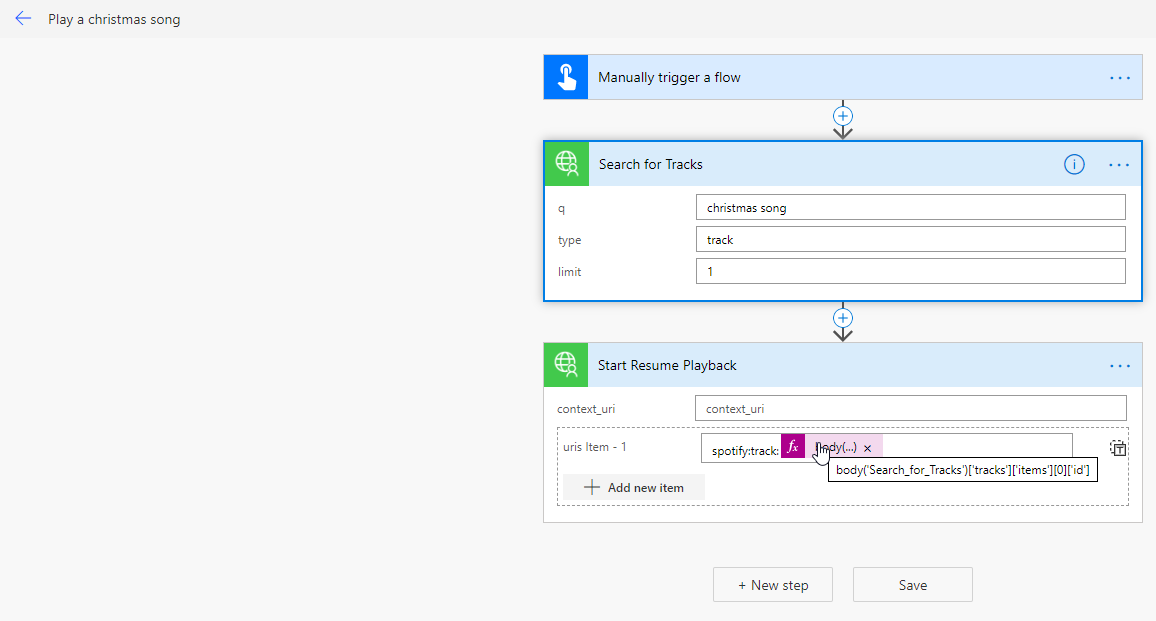
Complete flow
This is the expression I used to get the track id from the JSON response from the Search for tracks action -
body('Search\_for\_Tracks')\['tracks'\]\['items'\]\[0\]\['id'\]
Let’s see it in action now -
https://videopress.com/v/7hZPjqvA?preloadContent=metadata
2. In a Power App - Let’s make this one a challenge. Create a Power App with this custom connector and tweet a demo of it on Twitter with the hashtag #PowerPlaySpotify and I will do something special for you!
Here’s some inspiration -
https://videopress.com/v/0BVfbi8h?preloadContent=metadata
There is a lot more that you can do with this connector, especially for the holiday season. So go create this and tweet about it with the #PowerPlaySpotify . I would love to see your creativity with it.
Note: If you do end up using other actions / endpoints, make sure to check if the scope required for that endpoint is included in the Scope under security.
Enjoy and Happy holidays!

Photo by Brett Sayles on Pexels.com
Comments:
Power Automate Tutorial – How to Create a Custom Connector – Power Community -
[…] You can also check out this blog post that Vivek created on the same topic – https://thatapiguy.tech/2019/12/08/spotify-custom-connector-for-power-platform/ […]
#### [Darth Business (@prohib_IT)](http://twitter.com/prohib_IT "[email protected]") -
Awesome! Thank you for the tutorial. Is it possible to add the song’s name and the author to the Microsoft Teams Status?
#### [That API Guy]( "") -
Thank you for the comment. Microsoft Teams status is not something that is accessible through any of the Graph API endpoints as of today, so no way to programatically change it. Might be something that opens up in the future.
#### [efoucault](http://146rdb.wordpress.com "[email protected]") -
Hello, Inspired by your post I tried to create a canva app to create a spotify player like app. I succeeded in retrieving my playlists and tracks but I can’t seem to go to the next track due to a permission issue. I added the required permission in my custom connector : user-modify-playback-state but When I test it, I receive the following message: { “error”: { “status”: 401, “message”: “Permissions missing” } } { “Transfer-Encoding”: “chunked”, “x-robots-tag”: “noindex,nofollow”, “access-control-allow-origin”: “*”, “access-control-allow-headers”: “Accept,App-Platform,Authorization,Content-Type,Origin,Retry-After,Spotify-App-Version,X-Cloud-Trace-Context,client-token,content-access-token”, “access-control-allow-methods”: “GET,POST,OPTIONS,PUT,DELETE,PATCH”, “access-control-allow-credentials”: “true”, “access-control-max-age”: “604800”, “strict-transport-security”: “max-age=31536000”, “x-content-type-options”: “nosniff”, “Alt-Svc”: “clear”, “x-ms-apihub-cached-response”: “false”, “Cache-Control”: “max-age=0, private”, “Date”: “Wed, 24 Feb 2021 13:00:47 GMT”, “Via”: “HTTP/2 edgeproxy,1.1 google”, “Content-Type”: “application/json; charset=utf-8”, “Content-Length”: “79” } I don’t understand where it comes from. Would you be kind enough to give me a hand on this one ? thanks !
#### [Alec]( "[email protected]") -
THANK YOU!!!! Very helpful and informative. Didn’t skip a step at all, so very helpful to first time power automate users such as myself. Now I’m creating my own custom spotify flows to fit my needs.
#### [Power Automate Tutorial – How to Create a Custom Connector – TDG](https://powerplatform.app/archives/power-automate-tutorial-how-to-create-a-custom-connector/ "") -
[…] You can also check out this blog post that Vivek created on the same topic – https://thatapiguy.tech/2019/12/08/spotify-custom-connector-for-power-platform/ […]
#### [Playing Spotify on Google Home using Flic and Power Automate – TDG](https://powerplatform.app/archives/playing-spotify-on-google-home-using-flic-and-power-automate/ "") -
[…] blog post at https://thatapiguy.tech/2019/12/08/spotify-custom-connector-for-power-platform/ Road trip vlog at […]
#### [Vishesh Sethiya]( "[email protected]") -
I can’t send it to different environment of POwer automate, as while I test actions it gives error: Permission Missing.
#### [How to update your Microsoft Teams status using Power Automate - DZTECHNO](https://dztechno.com/how-to-update-your-microsoft-teams-status-using-power-automate/ "") -
[…] Spotify project by another Microsoft MVP, Loryan Strant. It takes a Spotify custom connector with a thorough guide created by That API Guy and updates their Microsoft Teams status to show what song and artist they are listening to on […]
#### [How to update your Microsoft Teams status using Power Automate – OnMSFT.com | Public Press Partner](https://www.publicpresspartner.com/how-to-update-your-microsoft-teams-status-using-power-automate-onmsft-com/ "") -
[…] Spotify project by another Microsoft MVP, Loryan Strant. It takes a Spotify custom connector with a thorough guide created by That API Guy and updates their Microsoft Teams status to show what song and artist they are listening to on […]
#### [Update Microsoft Teams Status with Apple Music “Now Playing” | Patrick Sprague](https://patricksprague.wordpress.com/2022/04/20/update-microsoft-teams-status-with-apple-music-now-playing/ "") -
[…] There are good resources for setting your Slack status from Spotify, or even your Teams status from Spotify. In fact, I relied heavily on Loryan Strant’s work, as well as work from DamoBird, Luise Freese, and That API Guy. […]
#### [Cách cập nhật trạng thái Microsoft Teams của bạn bằng Power Automate - AppFolder.net](https://appfolder.net/cach-cap-nhat-trang-thai-microsoft-teams-cua-ban-bang-power-automate "") -
[…] khác của Microsoft, Loryan Strant. Nó cần một trình kết nối tùy chỉnh Spotify với hướng dẫn kỹ lưỡng được tạo bởi That API Guy và cập nhật trạng thái Microsoft Teams của họ để hiển thị bài hát và nghệ […]
#### [angelo]( "[email protected]") -
hello, this is very good, I have created a folder that brings the albums of an artist but not all of them and it is paginated, how can I make it bring them all?
#### [So aktualisieren Sie Ihren Microsoft Teams-Status mit Power Automate - eloz](https://eloz.store/so-aktualisieren-sie-ihren-microsoft-teams-status-mit-power-automate/ "") -
[…] Microsoft MVP, Loryan Strant. Es benötigt einen benutzerdefinierten Spotify-Konnektor mit a ausführliche Anleitung erstellt von That API Guy und aktualisiert ihren Microsoft Teams-Status, um anzuzeigen, welchen Song und Interpreten sie auf […]
#### [So aktualisieren Sie Ihren Microsoft Teams-Status mit Power Automate - eloz](https://eloz.store/so-aktualisieren-sie-ihren-microsoft-teams-status-mit-power-automate-2/ "") -
[…] Microsoft MVP, Loryan Strant. Es benötigt einen benutzerdefinierten Spotify-Konnektor mit a ausführliche Anleitung, die von That API Guy erstellt wurde und aktualisiert ihren Microsoft Teams-Status, um anzuzeigen, welchen Song und Interpreten sie auf […]