Ever wanted to build your own photo library in an app without using much code? In this post, you will learn how to connect to the Google Photos API and get photos from your Google account in Power Apps / Power Automate.
Before you start
In order to build a custom connector for Google Photos and use it in Power Apps, you will need at-least these before you start building
- Google account.. duh! 😁
- Google Cloud Platform Account with a project having the authorization to use Google Photos API.
- Power Apps or Power Automate premium license . If you don’t have a premium license, you can always sign up for a free Power Apps developer plan.
Google Cloud Platform Account
Sign in to Google Cloud Platform https://console.cloud.google.com/ with your google account (that you use for Google Photos). Then follow the step below :
- Click on the projects section in the top nav menu and click on New Project.
- Give a name to your project and click Create.
- Navigate to the APIs & Service section and search for Google Photos API.
- Click on the Enable button.

Now that you have the project setup complete, let’s look at creating OAuth credentials for the project:
- Navigate to the Credentials section of the project.
- Click on Create New credentials and select OAuth Client Id from the dropdown.
- You will now be prompted to create an OAuth Consent screen before you can create the credentials.
- User Type: Select External
- App Information: Enter some app name, enter your email address for the the User support email and the Developer contact information.
- Scopes : Click on Add or Remove Scopes and then browse through the list of scopes to find the ones for Photos Library API and select all of them.
- Test Users : Add your own e-mail address as you will be testing this yourself.
- Navigate again to the Credentials section and click on Create new credentials and select OAuth Client Id from the dropdown.
- You will be asked to define the Application type. Select Web Application from the dropwdown.
- Proceed to the next step and you should see a Client ID and Client secret. Copy these into a notepad file as you will need these for creating the custom connector.
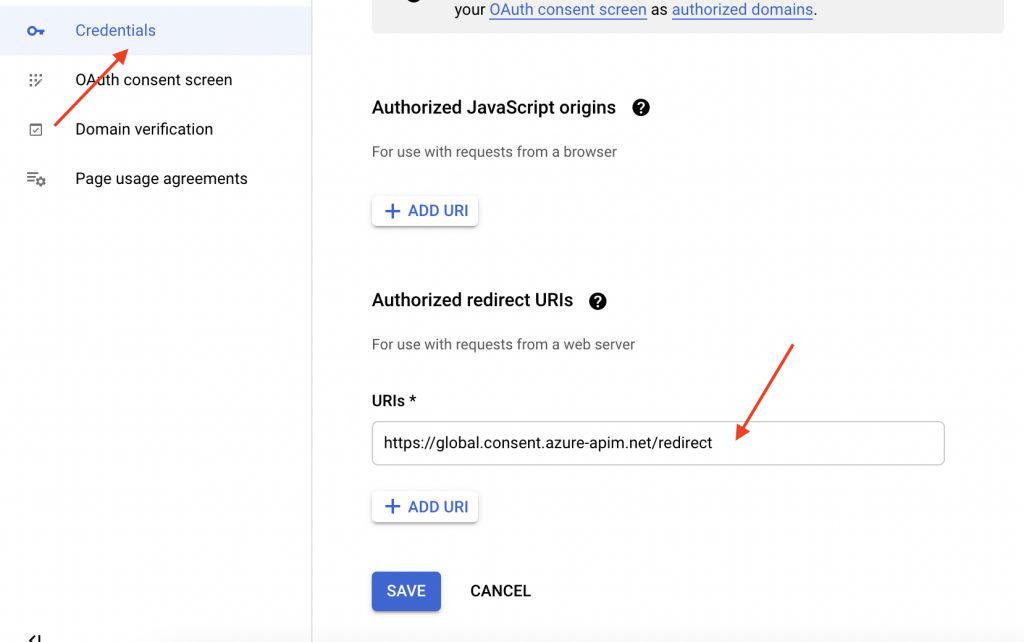
Google Cloud Platform Account - Create OAuth Credentials
Navigate back to the credentials section and add the below URL under Authorized redirect URIs -
https://global.consent.azure-apim.net/redirect
This is the redirect URL that will be added to your custom connector after you create it.
Create Custom Connector
Now that you have the credentials, let’s use them to create a Custom connector. Follow the steps below:
- Go to make.powerapps.com and navigate to Data > Custom connectors and click on create new.
- Note: If you are comfortable with solutions, create a Solution first and then create a new custom connector within the solution. It is a good practice to develop inside solutions so that you can easily move it another tenant/environment in the future.
- Now, let’s go through the different sections within the Custom Connector creation:
General section : Enter host URL as photoslibrary.googleapis.com
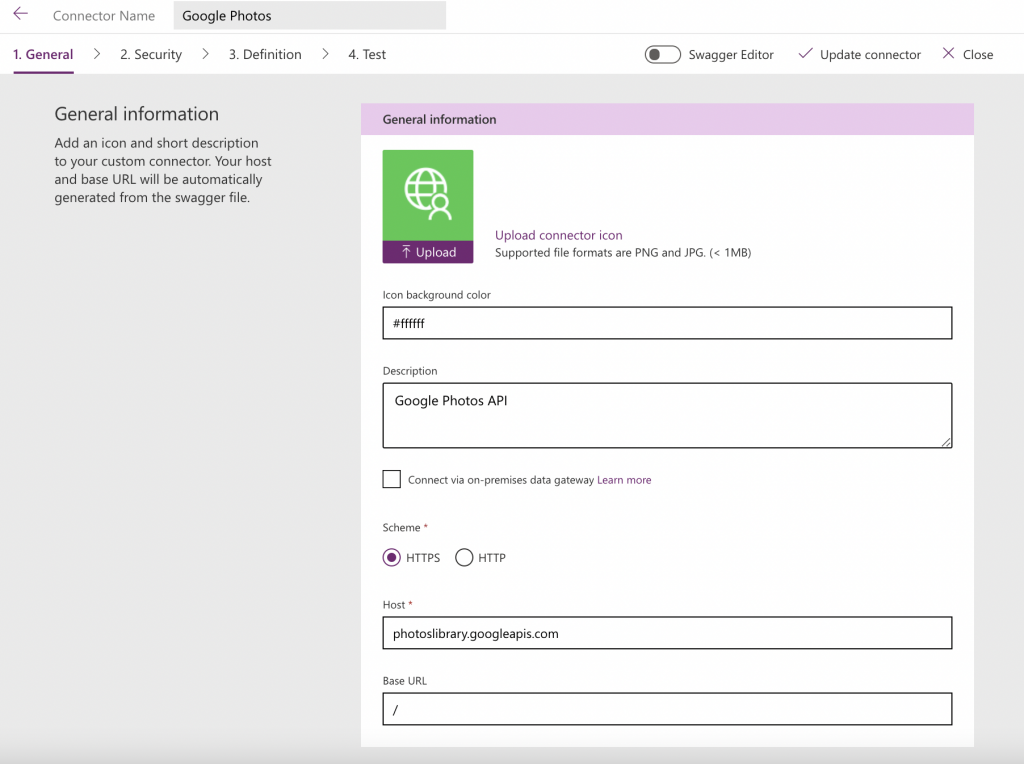
Custom Connector - General Section
Security Section:
- Choose OAuth 2.0 and select Google in the identity providers dropdown.
- Enter the Client Id and Client secret from the previous step.
- Enter the scope : https://www.googleapis.com/auth/photoslibrary
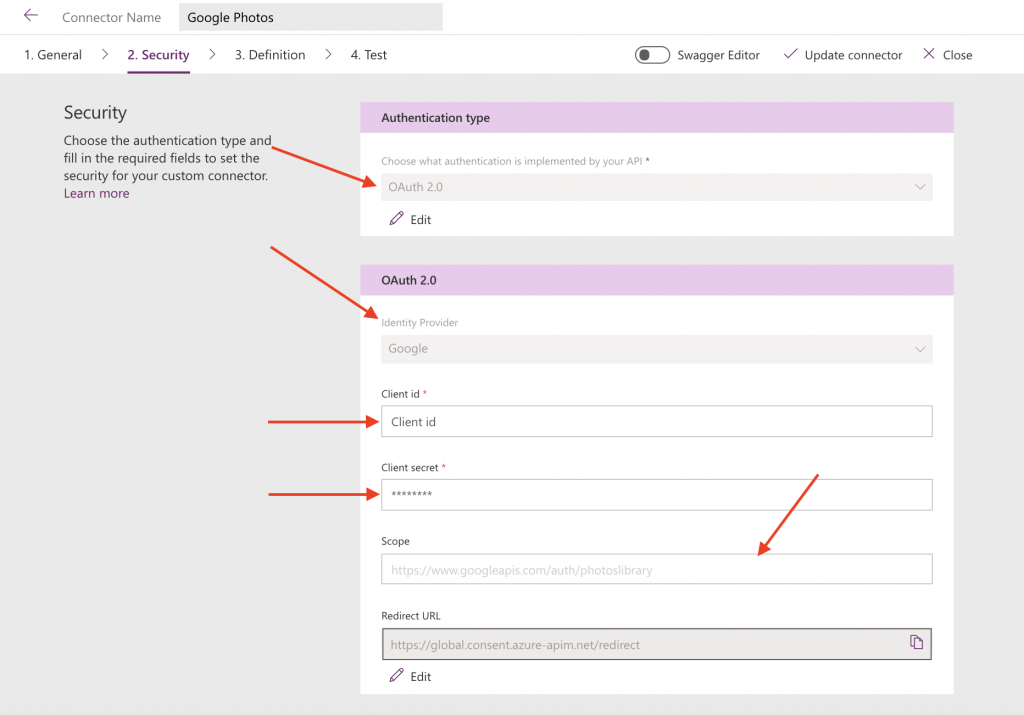
Custom Connector - Security Section
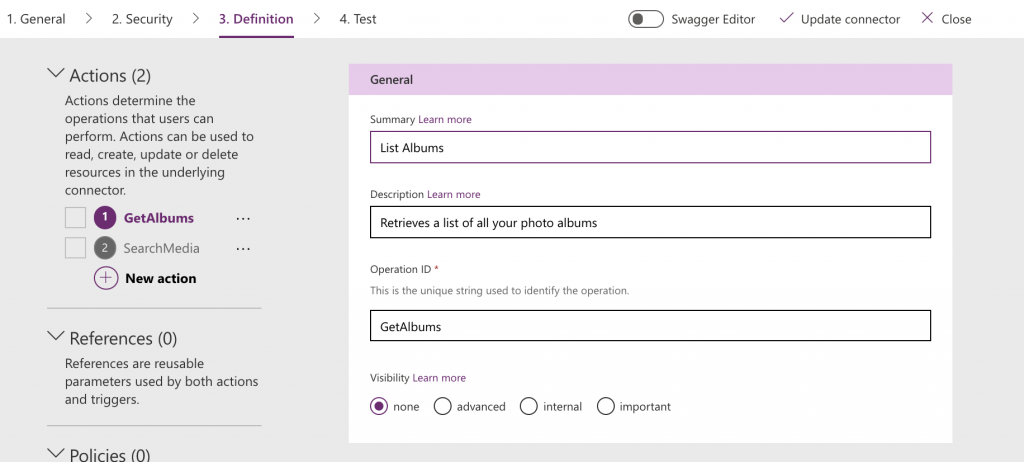
Definition Section:
Now we will add two actions - one to get albums and other to get photos based on the Google Photos API Reference
Get Albums action:
- Request URL : Click on Import from Sample and enter the URL : https://photoslibrary.googleapis.com/v1/albums?pageSize=5&pageToken=xyz
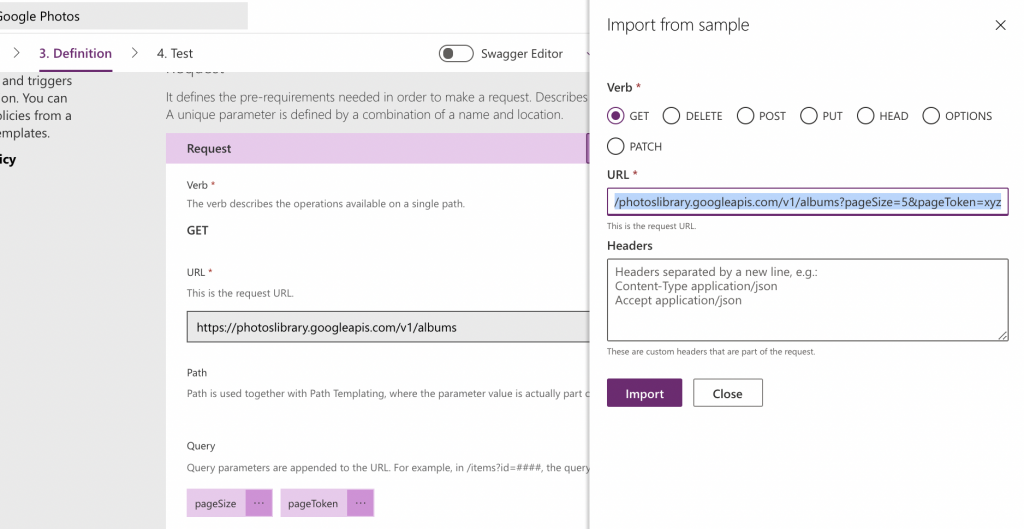
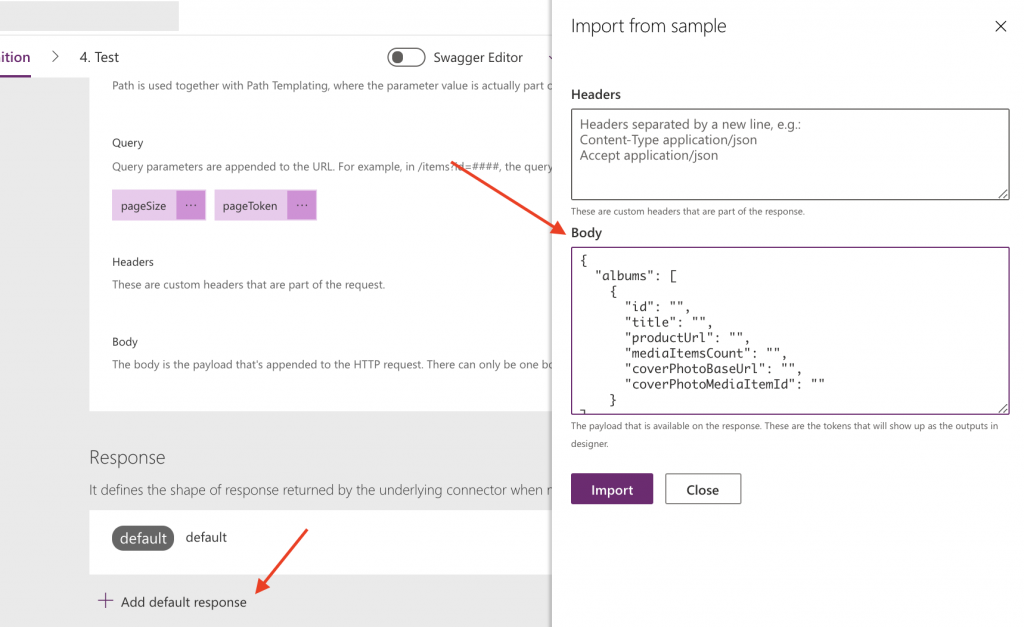
- Response : Click on Add Default response and add the below JSON in the body. This is the format in which you will receive the response back from the API.
{
  "albums": [
    {
      "id": "",
      "title": "",
      "productUrl": "",
      "mediaItemsCount": "",
      "coverPhotoBaseUrl": "",
      "coverPhotoMediaItemId": ""
    }
],
  "nextPageToken": ""
}
Search Media Action
- Request URL : Click on Import from Sample, Select POST as the request type and enter the URL : https://photoslibrary.googleapis.com/v1/mediaItems:search
- For the body, paste the JSON below, these are the different filter you can use when searching for your media. For more details, check out this.
{
  "albumId": "",
  "filters": {
    "excludeNonAppCreatedData": false,
    "includeArchivedMedia": false,
    "contentFilter": {
      "excludedContentCategories": [
        "a"
      ],
      "includedContentCategories": [
        ""
      ]
    },
    "featureFilter": {
      "includedFeatures": [
        ""
      ]
    },
    "mediaTypeFilter": {
      "mediaTypes": [
        ""
      ]
    }
  },
  "pageSize": null,
  "pageToken": ""
}
- Response : Click on Add Default response and add the below JSON in the body and click Import.
{
  "mediaItems": [
    {
      "id": "",
      "productUrl": "",
      "baseUrl": "",
      "mimeType": "image/jpeg",
      "mediaMetadata": {
        "creationTime": "2021-05-27T21:48:16Z",
        "width": "4032",
        "height": "3024",
        "photo": {
          "cameraMake": "Apple",
          "cameraModel": "iPhone 12 Pro",
          "focalLength": 1.54,
          "apertureFNumber": 2.4,
          "isoEquivalent": 25,
          "exposureTime": "0.001104972s"
        }
      },
      "filename": "IMG_3032.HEIC"
    }
],
  "nextPageToken": ""
}
At this point, if you haven’t already, hit the Save / Update Connector button.
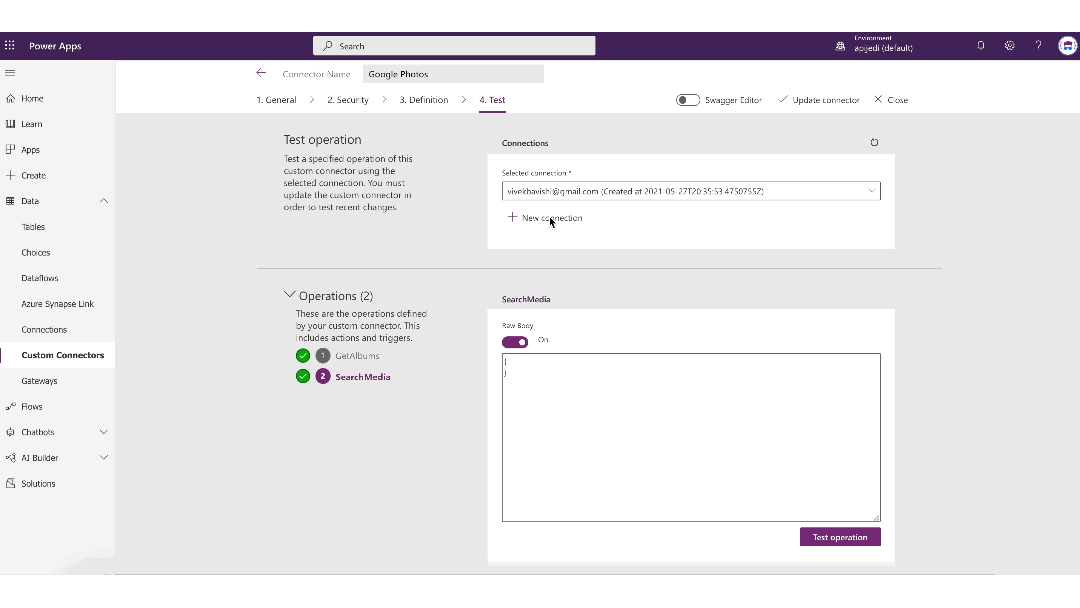
Test Section:
Click on New connection to create a connection and then you can test both your actions.
The first action should show you some of your Google Photos albums. The response contains a nextPageToken which you can use to call the API again to get the next set of albums.
Similarly, the media search action will return a list of photos/videos. Even with a blank search without any filters, it should return a list of media.
Create the Power app
Now is the fun part - creating the app which will show you the photos!
- Create a blank canvas app (preferably in landscape orientation) (Also, remember solutions? Create the app in a solution if you want the option to move the solution to another environment in the future.)
- Add the connection for custom connector by going to data sources and searching for Google Photos.
- Add two galleries (use the Image and two labels gallery template)- One for the Albums and another one for the photos
- Album Gallery Items PowerFx formulas
Items: GooglePhotos.GetAlbums({pageSize:50}).albums
OnSelect: ClearCollect(colAlbumPhotos,GooglePhotos.SearchMedia({albumId:Gallery1.Selected.id}).mediaItems)
Image: ThisItem.coverPhotoBaseUrl
Label1: ThisItem.title
Label2: ThisItem.mediaItemsCount
- Photos Gallery PowerFx formulas
Items: colAlbumPhotos
Image: ThisItem.baseUrl&"=d"
Label1: ThisItem.filename
Label2: ThisItem.mediaMetadata.photo.cameraMake&" "&ThisItem.mediaMetadata.photo.cameraModel
The resulting app should look something similar to this.
If you made it this far, thank you for reading the whole post. Hope you enjoyed it and are able to make some fun and creative app using this Google Photos API. I have just scratched the surface here. You can do a lot more with the API.
#mc_embed_signup{background:#fff; clear:left; font:14px Helvetica,Arial,sans-serif; } /* Add your own Mailchimp form style overrides in your site stylesheet or in this style block. We recommend moving this block and the preceding CSS link to the HEAD of your HTML file. */
* indicates required
Email Address *
First Name *
Last Name *
(function($) {window.fnames = new Array(); window.ftypes = new Array();fnames[0]=‘EMAIL’;ftypes[0]=‘email’;fnames[1]=‘FNAME’;ftypes[1]=‘text’;fnames[2]=‘LNAME’;ftypes[2]=‘text’;fnames[3]=‘ADDRESS’;ftypes[3]=‘address’;fnames[4]=‘PHONE’;ftypes[4]=‘phone’;}(jQuery));var $mcj = jQuery.noConflict(true);
Comments:
Excellent article! I was not aware that it was possible to integrate Google Photos with Power Apps, and this article provided a wealth of information on the subject. Your step-by-step instructions and clear explanations made it easy to understand the process. I am now excited to try integrating Google Photos into my Power Apps projects. Thanks for sharing this valuable information!